Hardware and CalibrationCalibrating the Reactable Live! |
The Reactable Live! is based on Computer Vision and Backprojection technology. Setting up the hardware of the Reactable Live! involves calibrating it in order to get the best possible results.
Calibrating the Projection System
Standard Calibration
There are 2 ways to calibrate the system. Normally you would only need the Standard calibration, accessible in the Setup menu - Calibration. The calibration works in 2 steps. First you have to center the project by aligning a circle with the outer border of the screen. The second step is fine-tuning by placing a cube onto the 5 squares on the table. Just follow the instructions given on the screen.Advanced Calibration
The advanced calibration is only necessary if the circle in the standard calibration is distorted (probably because of a different aspect ratio). In this mode you have to point 4 arrows to 4 points on the edge of the Reactable screen (top, bottom, left and right axes). The rest is equivalent to the standard calibration mode.Computer Vision (Reactivision)
The Reactable Live! comes with reasonable default values for the computer vision setup, so if in doubt, best is to leave them as they are and try to improve the lighting conditions. Anyhow, if this is not possible or if there are any other problems you have access to the advanced settings of the computer vision system
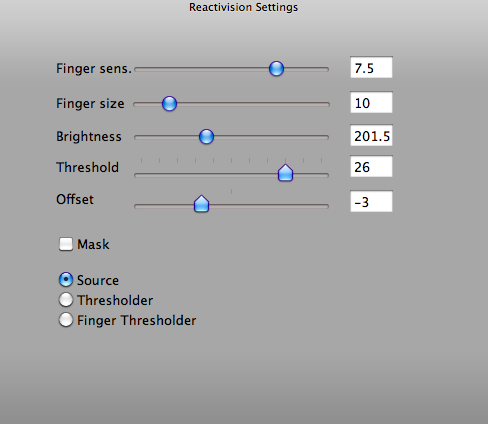
Start the Reactable Live! and in the menu go to "Settings"->"Show Reactivision". A window appears which shows the Reactable as seen by the camera in the Reactable core. You have 3 different views, the source view, threshold and finger threshold.
Object Detecion
In order to have good detection results you should be able to see any object put on the table clearly in the source view and the threshold view. Make sure the small white and black points in the fiducials are cleary visible. The size of the points can be influenced with the "offset" parameters. In some situations you might have to adjust the "offset" to a negative value (-5 for example) in order to improve object detection.Finger Detection
The finger threshold view is only applied to finger touch detection and this mode should be used together with the finger parameters in the settings table in order to adjust the finger detection. A finger is detected if you see a green point on the position of the finger.